¶ Skill/Spell Guide
¶ Warrior
| Image | Name | Magic Level | Cost | Effect | Required Level |
|---|---|---|---|---|---|
 |
Accuracy | Fixed | XP | Triple +Hit% | 15 |
 |
Shield | Fixed | XP | Triple Defense | 15 |
 |
Superman | Fixed | XP | Decuple physical damage; double damage when PKing | 15 |
 |
Roar | Fixed | XP | +20XP to teammates within the same screen | 15 |
 |
Flying Moon | 0 | XP | +480 magic attack | 40 |
| Flying Moon | 1 | XP | +1950 magic attack | 70 | |
| Flying Moon | 2 | XP | +5890 magic attack | 100 | |
 |
Dash | Fixed | Shield Durability | Knock back and attack the target | 63 |
Where can I learn the spells above?
Flying Moon
At level, 40 Warriors can go to the Market and Purchase Flying Moon from the Pharmacist, Flying moon costs 100,000 Silver.
All Other Warrior Specific Skills
Find the Warrior God in the Job Center, if you meet the requirements for each skill, the Warrior God will teach them to you.
How can I use the XP skills?
To use XP skills, you should wait until the XP bar has filled with gold color. When the XP bar has filled with gold color, the XP skill buttons will appear on the lower middle of the game screen right above your health and stamina. Click on one of them, and then right click on the target to release it. The XP skill buttons will disappear after 20 seconds or more and reappear when the XP bar has filled with gold color again, so you had better try to make good use of the XP skills before they disappear.
¶ Trojan
| Image | Name | Magic Level | Cost | Effect | Required Level |
|---|---|---|---|---|---|
|
Accuracy | Fixed | XP | Triple +Hit% | 15 |
 |
Cyclone | Fixed | XP | +Attack Frequency/Speed | 15 |
 |
Hercules | 0 | Stamina | +35% attack range | 40 |
| Hercules | 1 | Stamina | +35% attack range | 50 | |
| Hercules | 2 | Stamina | +35% attack range | 60 | |
| Hercules | 3 | Stamina | +40% attack range | 70 | |
| Hercules | 4 | Stamina | +40% attack range | Fixed | |
 |
Spirit Healing | 0 | Stamina | +500 HP | 40 |
| Spirit Healing | 1 | Stamina | +800 HP | 70 | |
| Spirit Healing | 2 | Stamina | +1300 HP | Fixed |
Where can I learn the spells above?
Enter the Job Center and speak with the Trojan Star, She will list the skills and allow you to learn them if you meet the requirements.
How can I use the XP skills?
To use XP skills, you should wait until the XP bar has filled with gold color. When the XP bar has filled with gold color, the XP skill buttons will appear on the lower middle of the game screen right above your health and stamina. Click on one of them, and then right click on the target to release it. The XP skill buttons will disappear after 20 seconds or more and reappear when the XP bar has filled with gold color again, so you had better try to make good use of the XP skills before they disappear.
¶ Archer
| Image | Name | Skill Level | Level Required | Arrow Cost per Shot | Damage | Range | Upgrade Level |
|---|---|---|---|---|---|---|---|
 |
Scatter | Elementary | 23 | 2 | (Arrow+Bow)*50% | Sector | 32 |
| Scatter | 1 | 32 | 2 | (Arrow+Bow)*55% | Sector | 48 | |
| Scatter | 2 | 48 | 2 | (Arrow+Bow)*60% | Sector | 54 | |
| Scatter | 3 | 54 | 3 | (Arrow+Bow)*65% | Sector | 66 | |
| Scatter | 4 | 66 | 3 | (Arrow+Bow)*68% | Sector | 72 | |
| Scatter | 5 | 72 | 3 | (Arrow+Bow)*72% | Sector | Fixed |
| Image | Name | Skill Level | Level Required | Cost per Shot | Damage | Upgrade Level |
|---|---|---|---|---|---|---|
 |
Rapid Fire | Elementary | 46 | Stamina,2 arrows | (Arrow+Bow)*150%, 2 shots at a time | 56 |
| Rapid Fire | 1 | 56 | Stamina,2 arrows | (Arrow+Bow)*180%, 3 shots at a time | 68 | |
| Rapid Fire | 2 | 68 | Stamina,3 arrows | (Arrow+Bow)*210%, 4 shots at a time | 78 | |
| Rapid Fire | 3 | 78 | Stamina,3 arrows | (Arrow+Bow)*240%, 5 shots at a time | 88 | |
| Rapid Fire | 4 | 78 | Stamina,4 arrows | (Arrow+Bow)*270%, 6 shots at a time | 98 | |
| Rapid Fire | 4 | 78 | Stamina,5 arrows | (Arrow+Bow)*300%, 7 shots at a time | Fixed |
| Image | Name | Skill Level | Level Required | Cost per Shot | Effect | Upgrade Level |
|---|---|---|---|---|---|---|
 |
Improved Fly | 1 | 70 | Stamina, 2 arrows | Fly for 40 seconds, Dodge physcial damage | Fixed |
| Advanced Fly | 1 | 100 | Stamina, 2 arrows | Fly for 60 seconds, Dodge physcial damage | Fixed |
| Image | Name | Skill Level | Level Required | Arrow Cost per Shot | Damage | Upgrade Level |
|---|---|---|---|---|---|---|
 |
Intensify | Elementary | 71 | 1 | (Arrow+Bow)*200% | 83 |
| Intensify | 1 | 83 | 1 | (Arrow+Bow)*250% | 93 | |
| Intensify | 2 | 93 | 1 | (Arrow+Bow)*300% | 104 | |
| Intensify | 3 | 104 | 1 | (Arrow+Bow)*350% | Fixed |
| Image | Name | Cost | Level Required | Effect | Note |
|---|---|---|---|---|---|
|
Elementary Fly | XP | 15 | Fly for 40 seconds, dodge physical damage | None |
|
Arrow Rain | XP | 70 | (Arrow+Bow)*100% Damage | Sector Attack |
Where can I learn the spells above?
Enter the Job Center and speak with the Archer God, She will list the skills and allow you to learn them if you meet the requirements.
How can I use the XP skills?
To use XP skills, you should wait until the XP bar has filled with gold color. When the XP bar has filled with gold color, the XP skill buttons will appear on the lower middle of the game screen right above your health and stamina. Click on one of them, and then right click on the target to release it. The XP skill buttons will disappear after 20 seconds or more and reappear when the XP bar has filled with gold color again, so you had better try to make good use of the XP skills before they disappear.
¶ Fire Taoist
| Image | Name | Magic Level | Cost | Effects | Hit Rate | Required Level |
|---|---|---|---|---|---|---|
 |
Thunder | 0 | 1MP | 7 | 100 | 1 |
| Thunder | 1 | 6MP | 16 | 100 | 10 | |
| Thunder | 2 | 10MP | 32 | 100 | 20 | |
| Thunder | 3 | 11MP | 57 | 100 | 30 | |
| Thunder | 4 | 17MP | 86 | 100 | Fixed | |
 |
Cure | 0 | 10MP | +20HP | 100 | 1 |
| Cure | 1 | 30MP | +70HP | 100 | 10 | |
| Cure | 2 | 60MP | +150HP | 100 | 20 | |
| Cure | 3 | 1000MP | +280HP | 100 | 30 | |
| Cure | 4 | 1300MP | +400HP | 100 | Fixed | |
 |
Fire | 0 | 21MP | 130 | 100 | Char Lv40 & Thunder Lv4 |
| Fire | 1 | 21MP | 189 | 100 | 60 | |
| Fire | 2 | 28MP | 275 | 100 | 70 | |
| Fire | 3 | 32MP | 380 | 100 | Fixed | |
 |
Meditation | 0 | Stamina | +310MP | 100 | 44 |
| Meditation | 1 | Stamina | +600MP | 100 | 74 | |
| Meditation | 2 | Stamina | +1200MP | 100 | Fixed | |
 |
Fire Ring | 0 | 33MP | 378 | 80 | 55 |
| Fire Ring | 1 | 33MP | 550 | 80 | 65 | |
| Fire Ring | 2 | 46MP | 760 | 80 | 75 | |
| Fire Ring | 3 | 53MP | 1010 | 80 | 85 | |
| Fire Ball | 4 | 53MP | 1332 | 80 | 95 | |
| Fire Ball | 5 | 60MP | 1764 | 80 | 105 | |
| Fire Ball | 6 | 82MP | 2332 | 80 | 115 | |
| Fire Ball | 7 | 102MP | 2800 | 80 | Fixed | |
|
Fire Meteor | 0 | 62MP | 760 | 40 | 52 |
| Fire Meteor | 1 | 74MP | 1040 | 43 | 62 | |
| Fire Meteor | 2 | 115MP | 1250 | 50 | 72 | |
| Fire Meteor | 3 | 130MP | 1480 | 55 | 82 | |
| Fire Meteor | 4 | 150MP | 1810 | 60 | 92 | |
| Fire Meteor | 5 | 215MP | 2210 | 65 | 105 | |
| Fire Meteor | 6 | 285MP | 2700 | 70 | 115 | |
| Fire Meteor | 7 | 300MP | 3250 | 75 | Fixed | |
 |
Fire Circle | 0 | 150MP | 540 | 100 | 65 |
| Fire Arista | 1 | 170MP | 650 | 100 | 75 | |
| Blaze | 2 | 190MP | 720 | 100 | 85 | |
| Inferno | 3 | 210MP | 770 | 100 | Fixed | |
 |
Tornado | 0 | 32MP | 505 | 100 | Char Lv90 & Fire Lv3 |
| Tornado | 1 | 36MP | 666 | 100 | 100 | |
| Tornado | 2 | 50MP | 882 | 100 | 110 | |
| Tornado | 3 | 64MP | 1166 | 100 | Fixed | |
 |
Bomb | 0 | 53MP | 855 | 80 | 82 |
| Bomb | 1 | 60MP | 1498 | 80 | 102 | |
| Bomb | 2 | 82MP | 1985 | 80 | 112 | |
| Bomb | 3 | 105MP | 2623 | 80 | Fixed | |
 |
Fire of Hell | 0 | 120MP | 180 | 100 | 84 |
| Fire of Hell | 1 | 150MP | 240 | 100 | 106 | |
| Fire of Hell | 2 | 180MP | 310 | 100 | 113 | |
| Fire of Hell | 2 | 210MP | 400 | 100 | Fixed |
| Image | Name | Magic Level | Cost | Damage | Required Level |
|---|---|---|---|---|---|
 |
Lightning | Fixed | XP | 50 | 1 |
 |
Volcano | Fixed | XP | 300 | 40 |
 |
Speed Lightning | Fixed | XP | 450 | 70 |
Where to learn the spells above?
- Thunder, Cure, Fire, Meditation, Tornado: Enter the Job center to learn from Taoist Star
- Lightning, Volcano, Fire Ring, Fire Meteor, FireCircle: Enter the Job Center to Learn from Taoist Moon.
- Speed Lightning: Go to the Market, buy the Speed Lightning Book from Pharmacist, open your inventory and right click on the book to learn.
- Bomb, Fire of Hell: Some mobs may drop a random spell book after you kill them, double click to pick it up, open your inventory and right click on the book to learn.
- Fire Arista, Blaze, Inferno: the advanced spells for Fire Circle.
- Fire Ball: the advanced spell for Fire Ring.
How can I use the XP skills?
To use XP skills, you should wait until the XP bar has filled with gold color. When the XP bar has filled with gold color, the XP skill buttons will appear on the lower middle of the game screen right above your health and stamina. Click on one of them, and then right click on the target to release it. The XP skill buttons will disappear after 20 seconds or more and reappear when the XP bar has filled with gold color again, so you had better try to make good use of the XP skills before they disappear.
¶ Water Taoist
| Image | Name | Magic Level | Cost | Effects | Hit Rate | Required Level |
|---|---|---|---|---|---|---|
|
Thunder | 0 | 1MP | 7 | 100 | 1 |
| Thunder | 1 | 6MP | 16 | 100 | 10 | |
| Thunder | 2 | 10MP | 32 | 100 | 20 | |
| Thunder | 3 | 11MP | 57 | 100 | 30 | |
| Thunder | 4 | 17MP | 86 | 100 | Fixed | |
|
Cure | 0 | 10MP | +20HP | 100 | 1 |
| Cure | 1 | 30MP | +70HP | 100 | 10 | |
| Cure | 2 | 60MP | +150HP | 100 | 20 | |
| Cure | 3 | 1000MP | +280HP | 100 | 30 | |
| Cure | 4 | 1300MP | +400HP | 100 | Fixed | |
 |
Healing Rain | 0 | 150MP | +100 HP to Teammates | 100 | 40 |
| Healing Rain | 1 | 270MP | +200 HP to Teammates | 100 | 50 | |
| Healing Rain | 2 | 375MP | +300 HP to Teammates | 100 | 60 | |
| Healing Rain | 3 | 440MP | +400 HP to Teammates | 100 | 70 | |
| Healing Rain | 4 | 500MP | +500 HP to Teammates | 100 | Fixed | |
|
Meditation | 0 | Stamina | +310MP | 100 | 44 |
| Meditation | 1 | Stamina | +600MP | 100 | 74 | |
| Meditation | 2 | Stamina | +1200MP | 100 | Fixed | |
|
Star of Accuracy | 0 | 200MP | +Hit% | 100 | 45 |
| Star of Accuracy | 1 | 250MP | +Hit% | 100 | 45 | |
| Star of Accuracy | 2 | 300MP | +Hit% | 100 | 50 | |
| Star of Accuracy | 3 | 350MP | +Hit% | 100 | 60 | |
| Star of Accuracy | 4 | 400MP | +Hit% | 100 | Fixed | |
|
Magic Shield | 0 | 200MP | +Defense | 100 | 50 |
| Magic Shield | 1 | 250MP | +Defense | 100 | 50 | |
| Magic Shield | 2 | 300MP | +Defense | 100 | 50 | |
| Magic Shield | 3 | 350MP | +Defense | 100 | 60 | |
| Magic Shield | 4 | 400MP | +Defense | 100 | Fixed | |
 |
Stigma | 0 | 200MP | +Attack in 20secs | 100 | 55 |
| Stigma | 1 | 250MP | +Attack | 100 | 55 | |
| Stigma | 2 | 300MP | +Attack | 100 | 55 | |
| Stigma | 3 | 350MP | +Attack | 100 | 60 | |
| Stigma | 4 | 400MP | +Attack | 100 | Fixed | |
 |
Invisibility | 0 | 200MP | Invisible | 100 | 60 |
| Invisibility | 1 | 250MP | Invisible | 100 | 70 | |
| Invisibility | 2 | 300MP | Invisible | 100 | 80 | |
| Invisibility | 3 | 350MP | Invisible | 100 | 90 | |
| Invisibility | 4 | 400MP | Invisible | 100 | Fixed | |
 |
Pray | Fixed | 1000MP | Resurect a fellow player | 100 | 70 |
|
Advanced Cure | 0 | 160MP | +500 HP | 100 | 81 |
| Advanced Cure | 1 | 190MP | +600 HP | 100 | 91 | |
| Advanced Cure | 2 | 215MP | +700 HP | 100 | 101 | |
| Advanced Cure | 3 | 235MP | +800 HP | 100 | 111 | |
| Advanced Cure | 4 | 255MP | +900 HP | 100 | Fixed | |
 |
Nectar | 0 | 600MP | +600HP to Teammates | 100 | 94 |
| Nectar | 1 | 660MP | +700HP to Teammates | 100 | 104 | |
| Nectar | 2 | 720MP | +800HP to Teammates | 100 | 114 | |
| Nectar | 3 | 770MP | +900HP to Teammates | 100 | 118 | |
| Nectar | 4 | 820MP | +1000HP to Teammates | 100 | Fixed |
| Image | Name | Magic Level | Cost | Damage | Required Level |
|---|---|---|---|---|---|
|
Lightning | Fixed | XP | 50 | 1 |
|
Revive | Fixed | XP | Resurrect a fellow player | 40 |
|
Volcano | Fixed | XP | 300 | 40 |
|
Speed Lightning | Fixed | XP | 450 | 70 |
Where can I learn the spells above?
When you meet the requirements, you may enter the Job Center to learn the above spells from the NPC named Taoist Moon or Taoist Star.
- Thunder, Cure, Meditation: Learn from Taoist Star
- The other Spells: Learn from Taoist Moon
How can I use the XP skills?
To use XP skills, you should wait until the XP bar has filled with gold color. When the XP bar has filled with gold color, the XP skill buttons will appear on the lower middle of the game screen right above your health and stamina. Click on one of them, and then right click on the target to release it. The XP skill buttons will disappear after 20 seconds or more and reappear when the XP bar has filled with gold color again, so you had better try to make good use of the XP skills before they disappear.
¶ Reborn Skills
- Summon:
A reborn character may Learn summon skills from Mighty Tao in Job Center (66,33). There are 6 summon skills. All level 15 reborn characters can learn Summon Guard. After level 40, each race can learn a special summon skill. A Euxenite Ore is required for learning Summon Guard, and a Gold Ore is required for a special summon skill.
¶ Summon Guard
Summon Guards (level 15): Reborn characters can learn summon spells from the Mighty Tao in Job Center (66,33). They can learn Summon Guard at level 15 (A Euxenite Ore is needed.) All guards have 100 Dexterity and 0 Magic defense.
| Image | Name | Level | Cost | Required Level |
|---|---|---|---|---|
 |
Summon Guard | Elementary | Stamina | 40 |
| Summon Guard | 1 | Stamina | 80 | |
| Summon Guard | 2 | Stamina | 105 | |
| Summon Guard | 3 | Stamina | Fixed |
| Name | HP | Damage | Defense | Dodge |
|---|---|---|---|---|
| Iron Guard | 10000 | 148 | 405 | 45 |
| Copper Guard | 20000 | 269 | 707 | 55 |
| Silver Guard | 35000 | 476 | 1505 | 65 |
| Gold Guard | 60000 | 646 | 1608 | 75 |
¶ Summon Monsters
Reborn Warrior: The Summoned Fire Evil can cast fire to attack the enemies.
Fire Rat: Reborn warriors can summon fire rats, with sharp claws and razor teeth (consumes stamina.) All fire rats have 100 Dexterity and 0 Magic defense.
Warrior's Summoned Fire Evil was taken out due to a bug. Flux may reimplement it in the future.
| Image | Name | Level | Cost | Required Level |
|---|---|---|---|---|
 |
Fire Rat A | Elementary | Stamina | 40 |
| Fire Rat B | 1 | Stamina | 70 | |
| Fire Rat C | 2 | Stamina | 100 | |
| Fire Rat D | 3 | Stamina | Fixed |
| Name | Level | HP | Magic Attack | Defense | Dodge |
|---|---|---|---|---|---|
| Fire Rat A | 40 | 3000 | 16 | 50 | 50 |
| Fire Rat B | 70 | 6000 | 60 | 300 | 60 |
| Fire Rat C | 100 | 15000 | 130 | 1000 | 70 |
| Fire Rat D | Fixed | 30000 | 400 | 2000 | 80 |
Reborn Trojan: The Summoned Vampire Bat can make the enemy lose health.
Evil Bat: Reborn trojans can summon nasty looking evil bats that flap their wings (consumes stamina.) All bats have 100 Dexterity and 0 Magic defense.
| Image | Name | Level | Cost | Required Level |
|---|---|---|---|---|
|
Evil Bat A | Elementary | Stamina | 40 |
| Evil Bat B | 1 | Stamina | 70 | |
| Evil Bat C | 2 | Stamina | 100 | |
| Evil Bat D | 3 | Stamina | Fixed |
| Name | Level | HP | Physical Attack Range | Defense | Dodge |
|---|---|---|---|---|---|
| Evil Bat A | 40 | 3000 | 14 | 50 | 30 |
| Evil Bat B | 70 | 6000 | 30-50 | 200 | 40 |
| Evil Bat C | 100 | 15000 | 50-90 | 800 | 50 |
| Evil Bat D | Fixed | 60000 | 70-130 | 1500 | 60 |
Reborn Archer: The Summoned Skeleton can help Archers to attack the enemies.
Skeleton: Reborn archers can summon fearsome skeletons who rattle thier bones terribly (consume stamina.) Skeletons have 100 Dexterity and 0 Magic defense.
| Image | Name | Level | Cost | Required Level |
|---|---|---|---|---|
|
Skeleton | Elementary | Stamina | 40 |
| Skeleton | 1 | Stamina | 70 | |
| Skeleton | 2 | Stamina | 100 | |
| Skeleton | 3 | Stamina | Fixed |
| Name | Level | HP | Physical Attack Range | Defense | Dodge |
|---|---|---|---|---|---|
| Skeleton A | 40 | 3000 | 14 | 50 | 50 |
| Skeleton B | 70 | 6000 | 30-50 | 200 | 60 |
| Skeleton C | 100 | 35000 | 50-90 | 1500 | 70 |
| Skeleton D | Fixed | 60000 | 70-130 | 2000 | 80 |
Reborn Water Taoist: The summoned Bat Boss is Water Taoist's substitute with high health.
Bat Bosses: Reborn water taoists can summon bat bosses (consumes XP.) Bats all have 100 Dexterity and 0 Magic defense.
| Image | Name | Level | Cost | Required Level |
|---|---|---|---|---|
|
Ghost Bat Boss | Elementary | XP | 40 |
| Fast Bat Boss | 1 | XP | 70 | |
| Swift Bat Boss | 2 | XP | 100 | |
| Magic Bat Boss | 3 | XP | Fixed |
| Name | Level | HP | Physical Attack | Defense | Dodge |
|---|---|---|---|---|---|
| Ghost Bat Boss | 40 | 10000 | 28 | 50 | 0 |
| Fast Bat Boss | 70 | 20000 | 66 | 200 | 0 |
| Swift Bat Boss | 100 | 35000 | 195 | 800 | 0 |
| Magic Bat Boss | Fixed | 60000 | 448 | 1500 | 0 |
Reborn Fire Taoist: The summoned Bat is Fire Taoist's substitute with high health.
Bats: Reborn fire taoists can summon ordinary bats (consumes XP.) Bats have 100 Dexterity and 0 Magic defense.
| Image | Name | Level | Cost | Required Level |
|---|---|---|---|---|
|
SummonBat | Elementary | XP | 40 |
| SummonBat | 1 | XP | 70 | |
| SummonBat | 2 | XP | 100 | |
| SummonBat | 3 | XP | Fixed |
| Name | Level | HP | Physical Attack | Defense | Dodge |
|---|---|---|---|---|---|
| Ghost Bat | 40 | 3000 | 28 | 50 | 50 |
| Fast Bat | 70 | 6000 | 66 | 200 | 60 |
| Swift Bat | 100 | 15000 | 195 | 800 | 70 |
| Magic Bat | Fixed | 30000 | 448 | 1500 | 80 |
¶ Disguise/Transformations
¶ For Trojans
Robot
| Image | Name | Magic Level | Cost | Required Level |
|---|---|---|---|---|
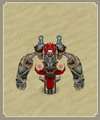 |
Robot | 0 | XP | 41 |
| Robot | 1 | XP | 46 | |
| Robot | 2 | XP | 51 | |
| Robot | 3 | XP | 61 | |
| Robot | 4 | XP | 71 | |
| Robot | 5 | XP | 81 | |
| Robot | 6 | XP | 91 | |
| Robot | 7 | XP | Fixed |
Disguise Details
| Name | Magic Level | HP | Min Damage | Max Damage | Defense | Dex | Dodge | Magic Defense |
|---|---|---|---|---|---|---|---|---|
| Robot | 0 | 50000 | 179 | 282 | 73 | 50 | 9 | 34 |
| Robot | 1 | 50000 | 245 | 395 | 126 | 55 | 12 | 45 |
| Robot | 2 | 50000 | 367 | 616 | 180 | 60 | 15 | 53 |
| Robot | 3 | 50000 | 429 | 724 | 247 | 65 | 15 | 53 |
| Robot | 4 | 50000 | 704 | 1231 | 499 | 70 | 20 | 50 |
| Robot | 5 | 50000 | 941 | 1673 | 601 | 70 | 25 | 53 |
| Robot | 6 | 50000 | 1107 | 1991 | 1029 | 70 | 30 | 55 |
| Robot | 7 | 50000 | 1235 | 2226 | 1029 | 70 | 35 | 55 |
¶ For Water Taoists
Water Elf
| Image | Name | Magic Level | Cost | Required Level |
|---|---|---|---|---|
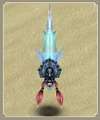 |
Water Elf | 0 | XP | 50 |
| Water Elf | 1 | XP | 60 | |
| Water Elf | 2 | XP | 65 | |
| Water Elf | 3 | XP | 70 | |
| Water Elf | 4 | XP | 80 | |
| Water Elf | 5 | XP | 90 | |
| Water Elf | 6 | XP | 100 | |
| Water Elf | 7 | XP | 110 | |
| Water Elf | 8 | XP | Fixed |
Disguise Details
| Name | Magic Level | HP | Min Damage | Max Damage | Defense | Dex | Dodge | Magic Defense |
|---|---|---|---|---|---|---|---|---|
| Water Elf | 0 | 1048 | 656 | 930 | 290 | 80 | 40 | 45 |
| Water Elf | 1 | 1130 | 750 | 1062 | 320 | 80 | 40 | 46 |
| Water Elf | 2 | 1205 | 910 | 1292 | 510 | 80 | 40 | 50 |
| Water Elf | 3 | 1279 | 1000 | 1428 | 600 | 80 | 40 | 53 |
| Water Elf | 4 | 1476 | 1100 | 1570 | 700 | 80 | 40 | 55 |
| Water Elf | 5 | 1629 | 1200 | 1700 | 880 | 80 | 40 | 57 |
| Water Elf | 6 | 1803 | 1300 | 1900 | 1540 | 80 | 40 | 59 |
| Water Elf | 7 | 1998 | 1500 | 2100 | 1880 | 80 | 40 | 61 |
| Water Elf | 8 | 2088 | 1600 | 2300 | 1970 | 80 | 40 | 63 |
Divine Hare
| Image | Name | Magic Level | Cost | Required Level |
|---|---|---|---|---|
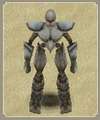 |
Divine Hare | 0 | Stamina | 55 |
| Divine Hare | 1 | Stamina | 65 | |
| Divine Hare | 2 | Stamina | 75 | |
| Divine Hare | 3 | Stamina | 85 | |
| Divine Hare | 4 | Stamina | Fixed |
Disguise Details
| Name | Magic Level | HP | Min Damage | Max Damage | Defense | Dex | Dodge | Magic Defense |
|---|---|---|---|---|---|---|---|---|
| Divine Hare | 0 | 3000 | 122 | 182 | 1300 | 100 | 35 | 94 |
| Divine Hare | 1 | 3000 | 134 | 200 | 1400 | 100 | 40 | 96 |
| Divine Hare | 2 | 3000 | 160 | 240 | 1500 | 100 | 45 | 97 |
| Divine Hare | 3 | 3000 | 172 | 258 | 1600 | 100 | 50 | 98 |
| Divine Hare | 4 | 3000 | 200 | 300 | 1900 | 100 | 55 | 99 |
¶ For All Classes
Night Devil
| Image | Name | Magic Level | Cost | Required Level |
|---|---|---|---|---|
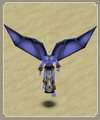 |
Night Devil | 0 | XP | 80 |
| Night Devil | 1 | XP | 90 | |
| Night Devil | 2 | XP | 100 | |
| Night Devil | 3 | XP | 110 | |
| Night Devil | 4 | XP | Fixed |
Disguise Details
| Name | Magic Level | HP | Min Damage | Max Damage | Defense | Dex | Dodge | Magic Defense |
|---|---|---|---|---|---|---|---|---|
| Night Devil | 0 | 4000 | 610 | 1215 | 100 | 100 | 30 | 96 |
| Night Devil | 1 | 4000 | 650 | 1310 | 400 | 100 | 30 | 97 |
| Night Devil | 2 | 4000 | 710 | 1420 | 650 | 100 | 30 | 98 |
| Night Devil | 3 | 4000 | 780 | 1555 | 720 | 110 | 30 | 98 |
| Night Devil | 4 | 4000 | 840 | 1660 | 1200 | 120 | 30 | 99 |
Where can I learn the spells above?
- Robot: Enter the Job Center to learn from Trojan Star
- Water Elf: Enter the Job Center to learn from Taoist Moon
- Divine Hare: Go to the Market and buy a Divine Hare book from Pharmacist, open your inventory, right click on this book to learn
- Night Devil: Found in DisCity Quest or dropped from Poltergeists.
¶ Lucky Time

Lucky Time is a magical aura gained through useage of the Bless skill. To gain lucky time, read the following
Bless Skill: Second rebirth characters can use the Bless skill to "accumulate" lucky time -a powerful skill to increase the probabilities of good item drops, better XP gain, higher damage, etc.
When you use the bless skill, your character stands still and begins accumulating lucky time. The time ticks up as you use the skill, so the longer you wait, the more lucky time you can spend (2 hours maximum.)
When you move, attack, or perform any other action, your lucky time starts to count down (at the same speed it was gained). So, if you used the skill for 5 minutes prior to moving, then you'll have 5 minutes before it runs out.
The Lucky Timer: The "Lucky Timer" will appear on the top left of the screen under the system messages, and it is marked as a Chinese Knot (a traditional Chinese handcraft used to express luck and prosperity).
Share Lucky Time: Lucky time can be shared with friends or strangers alike. If others stand near you, they get a chance to join in storing lucky time by "praying". If standing still, they can store lucky time when near a second rebirth character.
Second Rebirth Lucky Rate x3: The lucky time store speed is 3x times faster for second rebirth characters.
Lucky time also produces a number of beneficial affects when your character is fighting monsters or other players:
-
Critical Hits: Sometimes, you will score critical hits (double damage) on monsters. This applies to weapon attacks, magic attacks and special abilities.
-
Protection: When monsters or other characters attack you, there is chance that the damage will be greatly reduced.
-
Experience Flourish: When killing monsters, there is a small chance that you earn 10x the normal experience for killing that monster (only with melee weapons, not ranged or magic spells).
-
XP Bar Charge: If your level Is 5 higher than the monsters', and your XP bar is over half way full, there's a small chance of immediately filling your bar just by killing regular monsters.
-
Lucky Items: Sometimes, second rebirth character will discover meteors or meteor tears dropped by monsters. Furthermore, the chance of finding them is improved.
-
Super Items: The chance for a monster to drop a super items is increased.
-
Drop Dragonball: There is a small chance that a creature will drop a dragon ball with each kill.
-
Repairing/Refining Success: Lucky time helps be successful when up-leveling, repairing items, and socketing their items. It improves the chance to success. Also, you won't lose so much durability when repairing or refining fails.